Introduction to Collaboratex
Collaboratex is a web-based collaborative LaTeX editor designed for real-time document editing & project-based organization.
The project aims to remove limitations commonly found in existing collaborative LaTeX platforms, especially user count restrictions and lack of flexibility for academic environments.
This project was developed as a semester project at Kathmandu University and is also structured to support open source contributions.
The documentation is written to serve both evaluators and future contributors.
- Free & Open-Source
- Licensed under MIT
- Not so large codebase
- Simple and minimal UI design
- Minimal syntax highlighting
- Just works :)
This was a challenging project for both of us [@rajat, @manogya]
, mostly due to the time constraints, the scale of this project,
and the insane amount of work to be done in the frontend.
Contribution
If you’re interested in fixing bugs implementing features or anything check here.
License
The Collaboratex is licensed under MIT License.
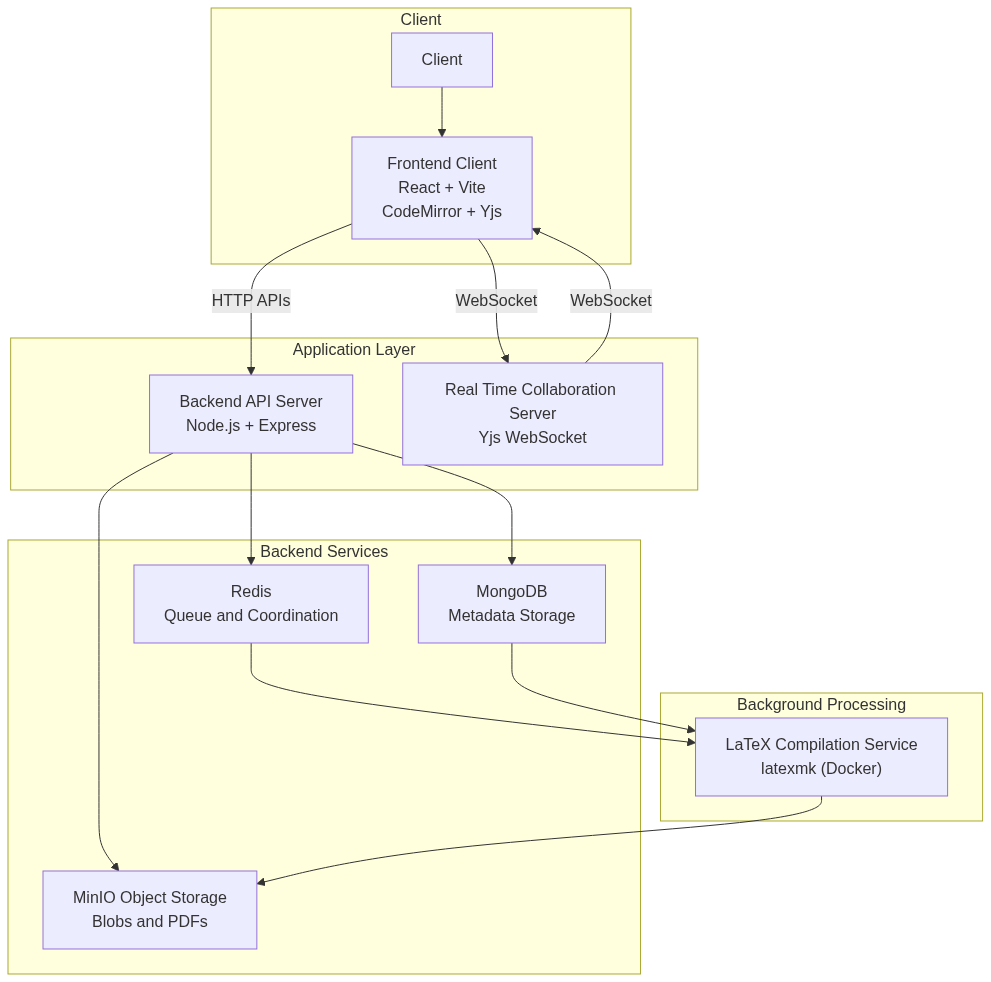
System Overview
Component Breakdown
Frontend (React)
- CodeMirror Editor - Rich text editing with LaTeX support
- Yjs Client - Local document state & conflict resolution
- Clerk Auth - User authentication & session management
- Real-time UI - Live cursor positions, user presence
Backend (Go)
- Gin Web Server - HTTP/GraphQL API
- Authentication - JWT verification with Clerk
- Authorization - Project access control
- File Management - Upload/download documents
Real-Time Layer (Node.js)
- Y-WebSocket Server - Manages document rooms
- Broadcast Hub - Distributes updates to clients
- Awareness - Tracks user presence & cursors
- Persistence - Stores document snapshots
Database (MongoDB,Redis,MinIO)
- Users - Account info & Clerk integration
- Projects - Document metadata, ownership, collaborators
- Files - Document content storage
- Snapshots - Periodic Y-doc backups
Architecture
┌──────────────────────────────────────────────────────────┐
│                    Web Browsers                          │
│  ┌──────────────┐  ┌──────────────┐  ┌──────────────┐    │
│  │ User A       │  │ User B       │  │ User C       │    │
│  │ (CodeMirror) │  │ (CodeMirror) │  │ (CodeMirror) │    │
│  └──────┬───────┘  └───────┬──────┘  └────────┬─────┘    │
└─────────┼──────────────────┼──────────────────┼──────────┘
          │                  │                  │
          │ HTTP/REST        │ HTTP/REST        │ HTTP/REST
          │ GraphQL          │ GraphQL          │ GraphQL
          │                  │                  │
          └──────────────────┼──────────────────┘
                             │
                    ┌────────▼────────┐
                    │  Backend Server │
                    │  (Go + Gin)     │
                    ├─────────────────┤
                    │ • Auth & JWT    │
                    │ • GraphQL API   │
                    │ • Rest API      │
                    │ • Permissions   │
                    │ • File/Zip ups  │
                    └────────┬────────┘
                             │
          ┌──────────────────┼──────────────────┐
          │                  │                  │
          ▼                  ▼                  ▼
     ┌─────────┐      ┌──────────────┐   ┌──────────┐
     │ MongoDB │      │ Y-WebSocket  │   │  MinIO   │
     │ (Users, │      │  Server      │   │ (Files)  │
     │ Projects)      │ (Node.js)    │   │          │
     └─────────┘      └──────┬───────┘   └──────────┘
                             │
          ┌──────────────────┘
          │
          │ WebSocket
          │ (Real-time sync)
          │
          └──────────────────┬─────────────────┐
                             │                 │
                    ┌────────▼────────┐        │
                    │    Yjs Docs     │        │
                    │  (In Memory)    │        │
                    └─────────────────┘        │
                             ▲                 │
                             │                 │
                    All connected clients ◄────┘
                    receive updates instantly
Data Flow
Document Edit → Sync
User types in CodeMirror
         │
         ▼
    Yjs detects change
         │
         ▼
    WebSocket update sent
         │
         ▼
   Y-Server receives
         │
         ▼
 Broadcast to all users
         │
         ▼
 All clients update live ✓
Project Access Flow
User requests project
         │
         ▼
  JWT token verified
         │
         ▼
Check owner/collaborator
         │
    ├─ Owner → Full access ✓
    ├─ Collaborator → Read/Write ✓
    └─ Other → Denied ✗
Technology Stack
The project uses the following technologies:
| Layer | Technology | Purpose |
|---|---|---|
| Frontend | React, TypeScript, Tailwind | User interface & editor |
| Backend | Go, Gin, GraphQL | API & business logic |
| Real-Time | Node.js, Yjs, y-websocket | Document sync |
| Auth | Clerk, JWT | User verification |
| Database | MongoDB | Data persistence |
| Storage | MinIO | File hosting |
| Queuing | Redis | Compilation Pipeline |
┌─ HTTPS/WSS (encrypted transport)
├─ JWT authentication (identity verification)
├─ Authorization checks (ownership/access)
├─ CORS (cross-origin protection)
└─ Database validation (prevent injection)
this section needs to be populated
Project Structure
├── collaboratex-frontend # well this is the frontend, crazy right?
│   ├── components
│   ├── pages
│   ├── public
│   ├── src
│   ├── App.tsx
│   ├── codegen.yml
│   ├── index.html
│   ├── index.tsx
│   └── ...
├── server # gin as the server and router, contains auth and token validator
│   ├── cmd
│   ├── internal
│   ├── go.mod
│   ├── go.sum
│   ├── gqlgen.yml
│   └── server.go
├── yjs-server # nodejs server runs on :1234, and syncs data between clients
│   ├── package.json
│   ├── pnpm-lock.yaml
│   └── server.js
├── docker-files...
├── LICENSE
└── README.md
See Installation Guide for running up each section.
System Architecture
Collaboratex uses a modular architecture, just like any other full-stack webapp, you’ll find\
- client side
- application layer(includes routes, middlewares)
- databases and services
This should give you some idea about the system desiging part.
Authentication and Authorization
A secure authentication system using Clerk for identity verification and MongoDB collection for storing userIds only. Ensures only authenticated and authorized users can access or modify documents.
Authentication Flow
User Login to Access Document
User Login
   │
   ▼
┌─────────────────────────────────────┐
│ Clerk OAuth/Email Sign-In           │
│ (Frontend: @clerk/clerk-react)      │
└─────────────────────┬───────────────┘
                      │
                      ▼
           JWT Token Generated
      (RS256 signed by Clerk)
                      │
                      ▼
      ┌──────────────────────────────┐
      │ Stored in HTTPOnly Cookie    │
      │ Auto-included in all requests│
      └──────────────────────────────┘
                      │
                      ▼
GraphQl Resolvers -> if User has project access
Request Authentication
API Request with JWT Token
User creation or validating flow.
Frontend Request
      │
      ▼
┌──────────────────────────────────────┐
│ Headers:                             │
│ Authorization: Bearer eyJhbGc...     │
│ Content-Type: application/json       │
└────────────┬─────────────────────────┘
             │
             ▼ (HTTPS)
┌──────────────────────────────────────┐
│ Backend Middleware                   │
│ GinClerkAuthMiddleware               │
├──────────────────────────────────────┤
│ 1. Extract token from header         │
│ 2. Verify with Clerk public key      │
│ 3. Check expiration                  │
│ 4. Extract clerkUserID               │
│ 5. Get/create user in MongoDB        │
│ 6. Add user to context               │
└────────────┬─────────────────────────┘
             │
             ▼
      Request Authorized ✓
      Proceed to resolver
Authorization Checks
Document Access Control
Flow of how a document is fetched through authorization.
User requests: GET /api/project/{projectId}
      │
      ▼
┌──────────────────────────────────────┐
│ 1. User authenticated? (JWT valid)   │
│    ├─ YES → Continue                 │
│    └─ NO → Return 401 Unauthorized   │
└────────────┬─────────────────────────┘
             │
             ▼
┌───────────────────────────────────────┐
│ 2. Check project ownership/access     │
│    Query: Project.ownerId == user.id  │
│    OR user.id in Project.collaborators│
├───────────────────────────────────────┤
│    ├─ Owner → Full access             │
│    ├─ Collaborator → Read/Write       │
│    └─ Other → Return 403 Forbidden    │
└────────────┬──────────────────────────┘
             │
             ▼
      Authorization passed ✓
      Return project data
Real-Time Collaboration System
The real-time collaboration system allows multiple users to edit the same document simultaneously. Changes are instantly synchronized across all connected clients with Yjs handling the complexity of operational transformation and conflict resolution.
Core Technologies
- Yjs - CRDT-based shared data structure for conflict-free collaboration
- y-websocket - WebSocket provider for real-time synchronization
- CodeMirror - Rich text editor with Yjs integration
- Node.js WebSocket Server - Central hub for document synchronization
Architecture
System Components
┌─────────────────────────────────────────────────────────────┐
│                    Web Browsers (Clients)                   │
├─────────────────────────────────────────────────────────────┤
│                                                             │
│  ┌──────────────────┐  ┌──────────────────┐  ┌───────────┐  │
│  │   User A         │  │   User B         │  │ User C    │  │
│  │  CodeMirror      │  │  CodeMirror      │  │ CodeMirror│  │
│  │  + Yjs Doc       │  │  + Yjs Doc       │  │ + Yjs Doc │  │
│  └────────┬─────────┘  └────────┬─────────┘  └─────┬─────┘  │
│           │                     │                  │        │
│           └─────────────────────┼──────────────────┘        │
│                                 │                           │
│                          WebSocket Updates                  │
│                           (JSON/Binary)                     │
└─────────────────────────────────┼───────────────────────────┘
                                  │
                    ┌─────────────▼──────────────┐
                    │   WebSocket Server         │
                    │   (Node.js + y-websocket)  │
                    │                            │
                    │  Document Rooms:           │
                    │  - Room 1 (Project A)      │
                    │  - Room 2 (Project B)      │
                    │  - Room N (Project N)      │
                    └────────────────────────────┘
Data Synchronization Flow
Single Edit Operation
User A types "function" in CodeMirror
         │
         ▼
Yjs detects text insertion at position 42
         │
         ▼
Creates update event with operation metadata
    {
      type: "insert",
      position: 42,
      content: "function",
      clientID: "user-a-xyz",
      clock: 1234
    }
         │
         ▼
WebSocket sends update to server
         │
         ▼
Server broadcasts to all other clients (B, C, D, ...)
         │
         ▼
Each client receives update
         │
         ▼
Yjs applies update to local document state
         │
         ▼
CodeMirror re-renders with new text
         │
         ▼
✓ All clients see "function" at position 42
Concurrent Editing Example
Two Users Editing Simultaneously
Well, what happens when multiple user are on a single project, but different sections?
See below:
Initial State:
Document: "Hello"
Cursor positions: A at index 5, B at index 0
Operations:
User A (timestamp: T1)          User B (timestamp: T1)
Inserts "!" at end              Inserts ">> " at start
        │                               │
        └───────────┬───────────────────┘
                    │
            Local operation applied
            Local reorder: T1-A, T1-B
                    │
                    ▼
         User A sees: ">> Hello!"
         User B sees: ">> Hello!"
Without Conflict Resolution (Bad):
User A alone would see: "Hello!"
User B alone would see: ">> Hello"
Inconsistent state → ✗ BROKEN
With Yjs CRDT (Good):
Yjs uses client IDs and logical clocks
Deterministic ordering: (clock, clientID)
Both users converge to: ">> Hello!"
Consistent state → ✓ WORKS
Real-Time Update Propagation
Multi-Client Synchronization Timeline
How does multi-Client synchronization happens?
T0:00 - User A connects to project "thesis-2024"
        │
        ├─ Handshake: Hello, I'm user-a-xyz
        ├─ Server: Here's the current document state
        └─ CodeMirror renders initial content

T0:05 - User B connects to same project
        │
        ├─ Server sends full document state to B
        ├─ Server notifies A that B joined
        └─ Awareness layer shows "User B is editing..."

T0:10 - User A types "Introduction"
        │
        ├─ Yjs creates update: insert(0, "Introduction")
        ├─ WebSocket sends to server (~5-10ms latency)
        ├─ Server broadcasts to B
        ├─ B receives and applies update
        └─ B's CodeMirror updates live ✓

T0:15 - User B types "Section 1" (while A is still editing)
        │
        ├─ B's update goes to server
        ├─ A receives B's update
        ├─ Yjs merges both edits (no conflicts!)
        ├─ Both see same final text
        └─ Automatic sync ✓

T0:20 - User A disconnects
        │
        ├─ Server marks A as offline
        ├─ B can continue editing
        └─ When A reconnects, gets full sync

T0:25 - User C connects
        │
        ├─ Server sends full document state
        ├─ C gets all A and B's edits
        └─ C's document is immediately current ✓
Conflict Resolution
Automatic CRDT Merging
SCENARIO: Two users insert at same position simultaneously

Initial: "Hello world"

User A: Insert "beautiful " at position 6
        Result intention: "Hello beautiful world"

User B: Insert "amazing " at position 6
        Result intention: "Hello amazing world"

════════════════════════════════════════════════════════════

WITHOUT YEJS (Simple Last-Write-Wins):
├─ User A's update arrives first: "Hello beautiful world"
├─ User B's update arrives second: "Hello amazing world"
└─ Result: B's text overwrites A's → DATA LOSS ✗

════════════════════════════════════════════════════════════

WITH YEJS (CRDT - Conflict-Free Replicated Data Type):
├─ A's insert: (position: 6, clientID: A, clock: 1)
├─ B's insert: (position: 6, clientID: B, clock: 1)
├─ Deterministic ordering by (clock, clientID)
│  → clientID: A < B (alphabetically)
│  → A's insert happens first in canonical order
└─ Result: "Hello beautiful amazing world"
   Both A and B converge to SAME final state ✓
   NO DATA LOSS ✓
Awareness State
Seeing Who’s Online
┌─────────────────────────────────────────────────┐
│ Document: "thesis-2024/main.tex"                │
├─────────────────────────────────────────────────┤
│                                                 │
│ Online Users:                                   │
│ ┌──────────────────────────────────────────┐    │
│ │ 🔴 Alice (you)          Editing Line 42  │    │
│ │ 🟢 Bob                  Idle for 30s     │    │
│ │ 🟡 Carol                Editing Line 128 │    │
│ └──────────────────────────────────────────┘    │
│                                                 │
│ Cursor Positions:                               │
│ │                                               │
│ │  Alice's cursor 🔴                            │
│ │  Bob's cursor           🟢                    │
│ │  Carol's cursor                      🟡       │
│ │                                               │
│ └─ Each user sees others' cursors in real-time  │
│                                                 │
└─────────────────────────────────────────────────┘
Real-Time In-Editor Chat System
The in-editor chat system allows collaborators working on the same project to communicate instantly without leaving the editor. The chat is session-based and exists only while users are actively connected to the project.
When a project is opened, the user is automatically connected to the chat room associated with that project.
Overview
- One chat room per project
- Users are connected automatically
- Messages are delivered instantly
- Chat history is not stored
- Messages disappear when all users leave
The chat is designed for quick coordination, not long-term discussion.
Technology Used
The chat backend is implemented using:
- Go for the server
- Gorilla WebSocket for real-time communication
- WebSockets for low-latency message delivery
This setup allows fast, reliable message exchange between all collaborators in a project.
How It Works
Automatic Connection
User opens a project
        │
        ▼
Client connects to chat server
        │
        ▼
User joins the project chat room
        │
        ▼
Chat is ready to use instantly
No manual “join” action is required.
Sending Messages
User types a message
        │
        ▼
Message is sent to the server
        │
        ▼
Server relays message to all users in the project
        │
        ▼
Everyone sees the message instantly
Messages are shared only with users who are currently online in the same project(collaborators).
Ephemeral Chat Behavior
The chat system does not store messages.
All users leave the project
        │
        ▼
Chat room becomes empty
        │
        ▼
All messages are discarded
If a user refreshes the page or reconnects later, the chat starts fresh.
Join and Leave Indicators
Users can see when others join or leave the chat in real time.
🟢 Alice joined the chat
🔴 Bob left the chat
This helps collaborators stay aware of who is currently active.
Typical Use Cases
- Coordinating edits in real time
- Asking quick questions
- Notifying others about changes
- Live discussion during collaboration
The chat is intended to support editing, not replace structured communication tools.
Separation from Document Editing
The chat system is independent from document editing:
- Document changes are handled by the collaboration engine
- Chat messages are handled by the chat server
This ensures that chat issues never affect document synchronization.
Installation
Currently our project itself hasn’t been hosted so what you’ll find here is a way to use this locally.
With that being said, let’s start the installation.
Clone the github repository
git clone https://github.com/razzat008/collaboratex
cd collaboratex
Dependencies
Grab the required dependencies for the servers:
# for the gin server
cd server
go mod tidy
# for the yjs-server
cd yjs-server
pnpm install
and the client:
cd collaboratex-frontend
pnpm install
Setting up Docker
We have separate containers for each database/service. (don’t ask us why) Make sure you have docker installed and privileges setup beforehand.
sudo pacman -S docker
# start the docker daemon
sudo systemctl start --now docker.service
# check if the daemon is running
systemctl status docker.service
docker-minio.yml
This docker image is responsible for launching up an instance of MinIO server. MinIO server is used to store assets like BLOBs, images(for now).
Make sure to add the .env variables before spinning up an instance.
This is default for now.
MINIO_PASS=minioadmin
MINIO_USERNAME=minioadmin
Run the container
docker compose -f docker-minio.yml up -d
docker-redis.yml
This is for running up a redis-server docker instance.
docker compose -f docker-redis.yml up -d
docker-compose.yml
This is to spin-up the MongoDB server.
docker compose -f docker-compose.yml up -d
docker-texlive.yml
This is for running the actual compilation of LaTeX files into pdf.
docker compose -f docker-texlive.yml up -d
Dockerfile
This is for installing the necessary, dependencies and libraries for running the latexmk(for pdf compilation).
docker compose -f Dockerfile up -d
Running the Project Locally
If you haven’t installed anything then, check here. Ensure docker instances are running, see here on how to start one up.
Make sure:
-
.envvars are set -
Backend server is running
cd server
go run cmd/server/main.go # run the server(gin)
- React client is running
cd collaboratex-frontend
pnpm dev # react frontend
- WebSocket services
cd yjs-server
node server.js
Then open your browser, head where frontend is running, Signup and enjoy.
Future Work
This project was a bit rushed, due to the never stopping marching of time, that’ll end all of us.
Well, what can be improved/added for this project?
- Version history and document rollback
- Compilation of LaTeX takes a while, so optimization is needed
- Both of us working on this project are not frontend developers, so the UI/UX sucks
- Role based access control
- Link sharing and all
Loved reading? Feel free to leave a star💫.
Contributing to Collaboratex
How to get started?
well, what do we have here??
Fork & Clone
1. Fork the repository on GitHub
   github.com/yourusername/collaboratex

2. Clone your fork
   git clone https://github.com/yourusername/collaboratex.git
   cd collaboratex

3. Add upstream remote
   git remote add upstream https://github.com/original/collaboratex.git
Create Feature Branch
git checkout -b feature/your-feature-name

Branch naming:
├─ feature/add-dark-mode
├─ fix/websocket-reconnection
├─ docs/update-readme
├─ refactor/optimize-sync
└─ test/add-unit-tests
Development Setup
For Development setup see this
Commit Guidelines
Commit Messages
Good commit messages:
- fix: resolve websocket reconnection timeout issue
- feat: add dark mode toggle to editor
- docs: update authentication flow diagram
- refactor: optimize yjs update batching
- test: add unit tests for addCollaborator resolver

Format: type(scope): brief description
- Keep under 50 characters
- Use imperative mood ("add" not "added")
- No period at end
Pull Request Process
Before Submitting
Make sure you’re on latest upstream
1. Sync with upstream
   git fetch upstream
   git rebase upstream/main

2. Push to your fork
   git push origin feature/your-feature

3. Go to GitHub and create PR
Have a nice day!!